
[2026 Edition] Complete Guide to the Online Japanese Passport Application: How to Submit Your Photo (with Screenshots)

Since March 2025, Japanese passport applications can be submitted online anywhere in Japan.
You no longer need to visit a government office. You can complete the whole application from home on your smartphone or computer, which saves a lot of time and effort.
However, many people get stuck along the way, whether on the digital photo requirements or on the application flow through Myna Portal (Japan's government online services portal).
Based on the latest information from the Ministry of Foreign Affairs, this article walks you through the online application steps with screenshots.
If you are planning to apply for a passport online, we hope it helps!
Common mistakes and how to avoid them ↓
[Online Passport Application] Smartphone Photos Are Getting Rejected! 10 Common Mistakes and How to Fix Them | 19Studio Shinjuku – Job-Hunting Photos, Same-Day Booking, Lowest Price
Since March 2025, online passport applications have been available across Japan. You can now use a photo taken with your smartphone as is, making the process much easier than before…
 19Studio Shinjuku – Job-Hunting Photos | Same-Day Booking, Lowest Price

Table of Contents
- What You Need for the Online Passport Photo Submission
- Step-by-Step: How to Submit Your Photo in the Online Passport Application
・Step 1: Log in to Myna Portal
・Step 2: Select "Obtain a Passport (New Application)"
・Step 3: Check the pickup location and your electronic signature certificate
・Step 4: Register your photo
・Step 5: Photo requirements
・Step 6: Choose how to provide your photo ・Step 7-1: If you choose "Start the camera and take a photo"
・Step 7-2: If you choose "Upload a photo"
・Step 8: Photo check results
・Step 9: Done
- Summary: Make Your Online Application Go Smoothly
What You Need for the Online Passport Photo Submission
To complete the online application smoothly, prepare the following items in advance.
Passwords in particular are a common stumbling block, so check them beforehand.
1. Smartphone
You will apply through the Myna Portal app.
Make sure your smartphone can read a My Number Card (NFC function).
2. My Number Card
The My Number Card is Japan's official national ID card with an IC chip, and it is used here to verify your identity.
3. Your My Number Card passwords
You need the following two passwords.
If you have forgotten either one, you will need to have it reset at your city or ward office.
User authentication certificate password (4 digits): used to log in to the Myna Portal app.
Electronic signature certificate password (6–16 alphanumeric characters): required when you submit the application.
4. Photo data (not needed if you take the photo during the application)
Prepare a photo taken within the last 6 months.
It must meet international standards: a plain background (white or light blue, for example), no shadows, and no glare on glasses and no colored contact lenses.
5. A valid passport (not needed for a new application)
Only needed if you are renewing your passport or applying to change details printed in it.
Step-by-Step: How to Submit Your Photo in the Online Passport Application
Here is the concrete procedure for submitting your photo in the online passport application.
Reference: https://img.myna.go.jp/manual/03-10/0225.html#spb-column-51
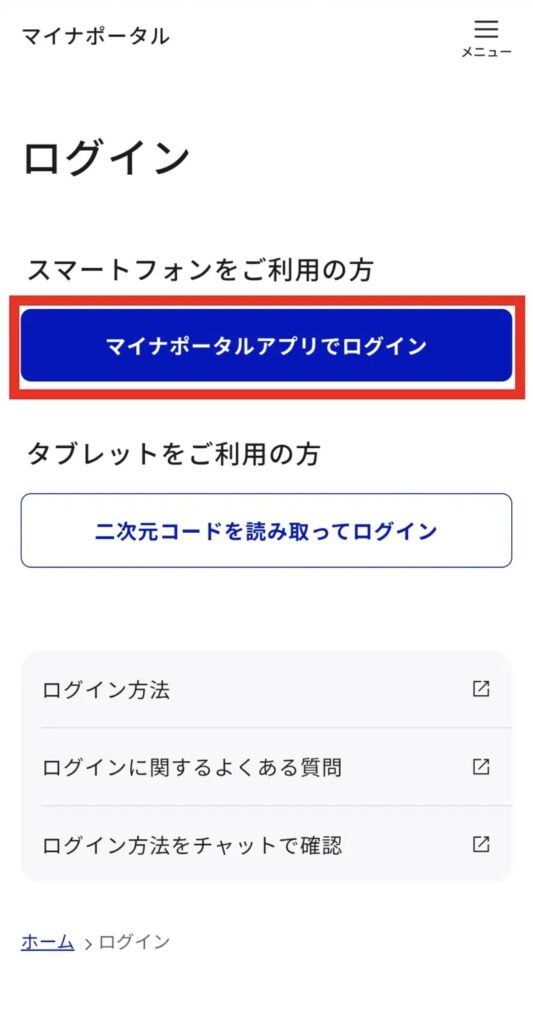
Step 1: Log in to Myna Portal
The whole procedure is done after logging in to Myna Portal.
▼ Log in here
https://myna.go.jp/html/passport_information.html
Log in with the Myna Portal app
→ Enter the user authentication certificate password (4 digits) for your My Number Card
→ Scan your My Number Card

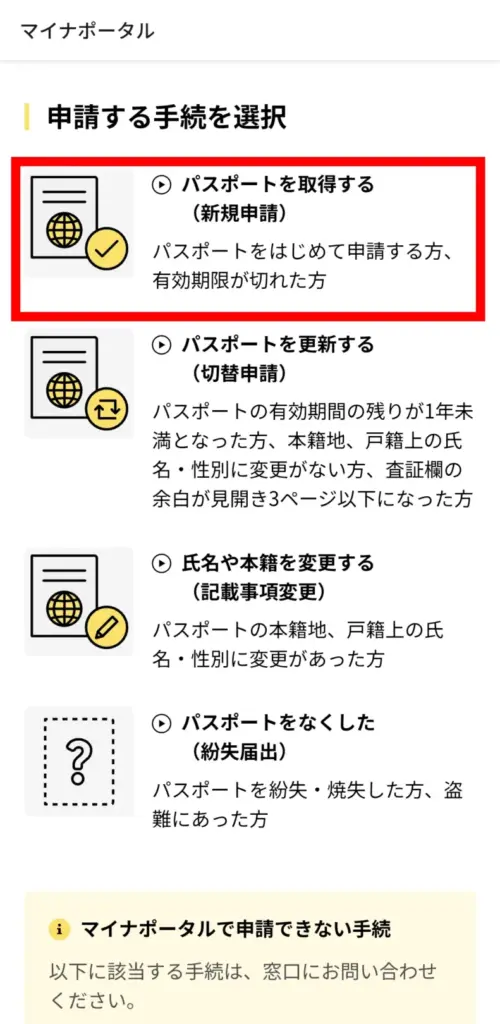
Step 2: Select "Obtain a Passport (New Application)"
Scroll down and tap "Obtain a Passport (New Application)".
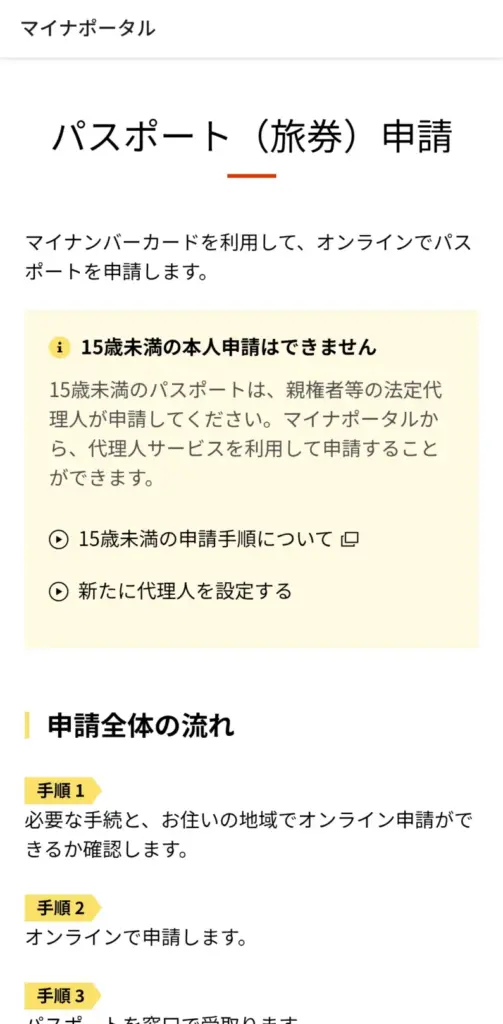
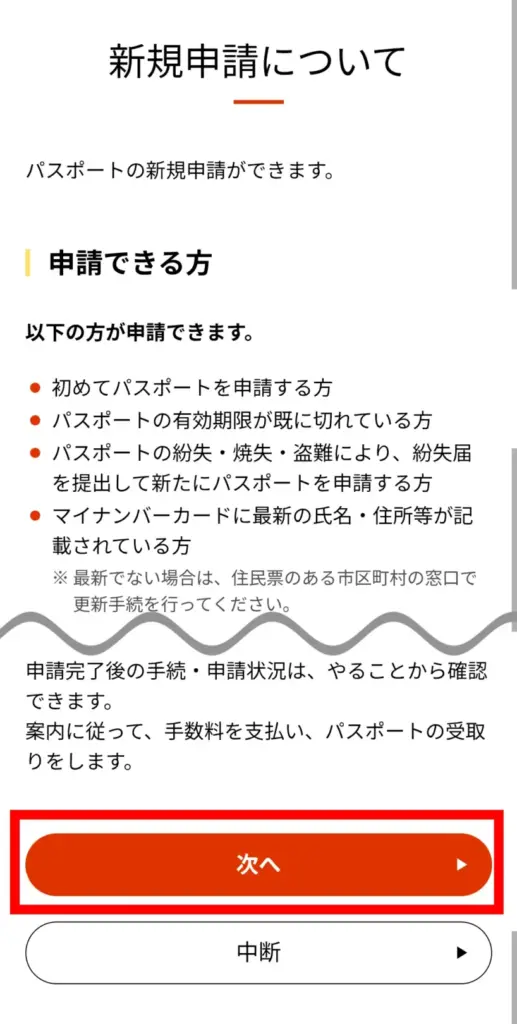
Step 3: Check the pickup location and your electronic signature certificate
After reading the information about new applications, scroll to the bottom and tap "Next".
→ Select the office where you will pick up your passport
The address you enter must be the one printed on your My Number Card.
Before applying, be sure to confirm that you can pick up your passport at that location.
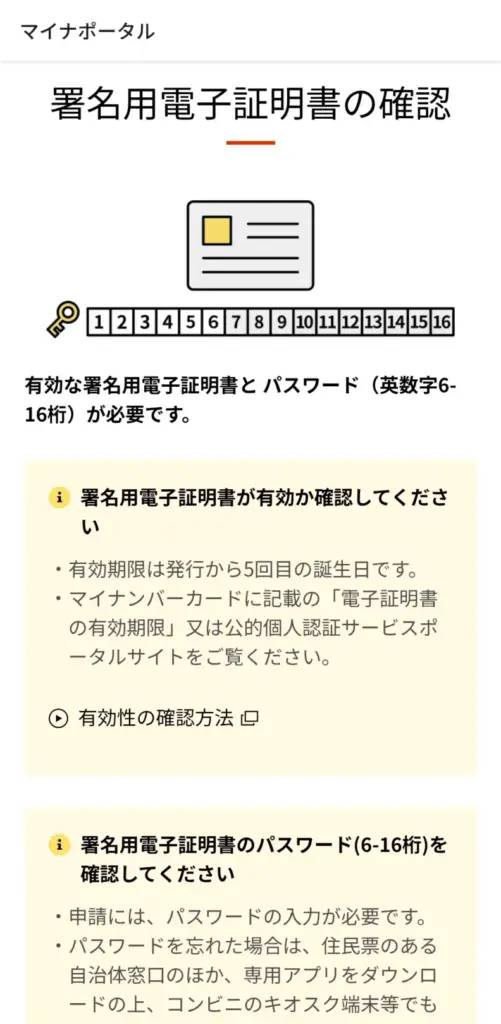
→ Read the notes, tap "Agree" to continue, and check the following two points.
・Your electronic signature certificate is valid
・You know your electronic signature certificate password (6–16 characters)
Step 4: Register your photo
Next, you will prepare the photo for your application.
Tap "Create".

Step 5: Photo requirements
After reading the requirements, tap "Take and upload a photo in the Myna Portal app".
If your photo does not meet the requirements shown on this screen (size, shadows, background, and so on), it will be rejected during the later review.
Shadows and uneven background color in particular are easy to get wrong with smartphone photos, so take extra care.

Step 6: Choose how to provide your photo
To take the photo right now, choose "Start the camera and take a photo".
If the image is already saved on your device, choose "Select and upload a photo".

Step 7-1: If you choose "Start the camera and take a photo"
Follow this step if you want to take your photo on the spot.
The camera starts and shooting precautions are displayed.
Tap "Proceed to shooting" → line up your face with the guide and press the shutter button.


Check the photo you took. If it looks fine, tap "Use this photo".

Step 7-2: If you choose "Upload a photo"
Follow this step if you want to upload photo data you prepared in advance.
The Myna Portal app has a cropping function, so you can also adjust the photo to meet the standards.
Tap "Select a photo"
→ Choose the photo you want to use from those saved on your device.


Review the image you selected.
If there are no problems, tap "Use this photo".

Step 8: Photo check results
Your photo is checked automatically.
If there are no problems, tap "Next".
*If the photo has a problem, an error will appear and you will need to retake it.

Step 9: Done
Your photo is now registered.
*Note that even if your photo passes the automatic check, it may still be rejected later during the official review.

That completes the photo upload.
To go on to register your handwritten signature image and enter the preliminary application information, tap "Proceed to the next step".
How to register your handwritten signature image ↓
Need a Passport Photo in Shinjuku? Try 19Studio!
19Studio in Shinjuku offers passport photo shooting!
Our staff give you an objective second opinion on your posture and expression, so you leave with a photo you are happy with.
Using professional lighting to brighten your whole face, our photographers carefully help make sure your eyes, ears, and face outline are not hidden.
Through retouching, we completely remove shadows from the background for a crisp, clear result.
We also adjust your face size, position, and framing to the exact pixel to meet the requirements of the online passport application, and deliver digital data that follows the rules.
With high-quality photo data from a real photo studio, you can approach the online application with confidence.
Same-day booking and same-day delivery are available, so we are also a great choice if you need a passport photo in a hurry!

Summary: Make Your Online Application Go Smoothly
With a compatible smartphone, your My Number Card, and photo data that meets the requirements, you can complete your passport application online without going to a counter.
Following the steps in order will make everything from application to issuance go smoothly.
We hope this article helps you with your online passport application!

- I'm involved in 19Studio as a new business of an IT company, and my day job is advertising and marketing. I'm good at thinking about how to get the right information to the people who need it, and I work on making our prices, services and booking as clear and easy as possible.
Latest posts
 ID photoSeptember 16, 2026【2026 Edition】A Must-See for Students Taking the AO Admissions Exam! Tips for ID Photos That Bring You Closer to Passing
 Concerns about Job HuntingSeptember 14, 2026【Latest 2026 Edition】Is This Photo Okay? Retake Standards for Job-Hunting ID Photos & Checklist to Avoid Rejection
 Concerns about Job HuntingSeptember 11, 2026Is Self-Applied Makeup OK for Job Hunting? Points for Making a Good Impression and Tips for Success

